
- By: Josie
- Category: Help & Advice
- 0 comment
When designing a small kitchen, it’s crucial to use every centimetre of space. We’ve covered this briefly in a previous blog post, Tiny Kitchens, Tinier Budget, but there’s so much to say on it, we’re writing a whole other one too.
Small kitchens are a common problem, and yet one that’s difficult to solve even when it’s possible to completely redesign the room. It requires a lot of designer know-how, a good knowledge of what the best space saving products on the market are, and a creative layout to fully maximise limited space. When considering how to lay out a small kitchen, often the most effective way to begin is with a galley layout. This avoids any wasted corner space, and means that every area of the worksurface is accessible.
If the starting point is a galley layout, the next thing to consider is the ‘zones’ of the kitchen. Where do you cook? Where do you make snacks and drinks? When is the kitchen most used? All of these questions are key to creating a unique kitchen that works for you, as everyone’s kitchen needs are different.
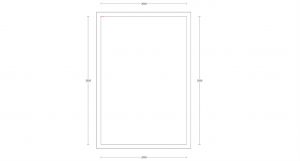
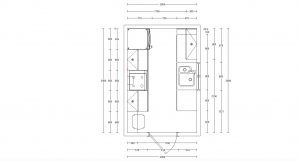
Firstly, where is the window? Can the sink and tap be centred in front of the window? If yes, awesome! If not, don’t panic – get as close as you can to the source of natural light. This creates a starting point for your design. From here, it’s possible to start ‘zoning’ your kitchen.
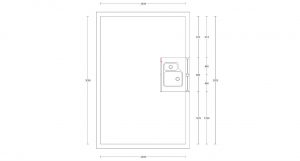
The first, and possibly most important, zone is the cooking zone. This is where your oven, hob, and any other equipment that gets used regularly when cooking should be stored. Chopping boards, saucepans, knives, etc. should be within close proximity, as should be an area for hot pans to be placed down (a perfect solution for this is heat-proof steel rods set into the worktop next to the hob, which all pans to be set down without potentially damaging an expensive worksurface!). In our case, this is on the side opposing the sink, as the cooking zone takes up the largest space in the kitchen and the full length of the galley kitchen can be used.
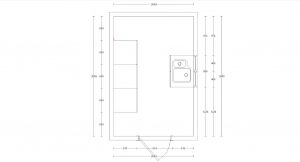
IMPORTANT: When choosing the location of your fridge, it’s crucial to make sure there’s space for the door to open as fully as possible – if it’s located directly next to the wall, this may inhibit how far it can open. To comply with fire safety regulations, a good rule of thumb is to keep the hob at least 600mm from the nearest wall/tall unit, and to ensure any units/extractors above the hob are not too low down, as this again constitutes a fire risk, and may cause heat damage to the doors.
The second zone to consider is the area where drinks/snacks and other small items may be prepared. As the cooking zone is geared towards full meals, this second zone should be clearer, and in the case of the plan that we are creating, would be best suited opposite the fridge, next to the sink. This allows for a work surface to be dedicated to it, and glasses/mugs etc. can be kept in a wall cabinet or base unit in the same area. By working around the kitchen like this, it creates purpose built areas for items to kept and used, without clutter overtaking an already limited space.

Consider what kind of small items get made in the kitchen – for example, in our drinks zone I’ve included a wine rack and a wall unit specifically for mugs, glasses, and the like.
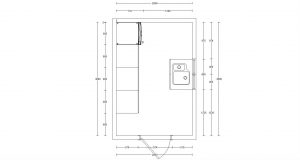
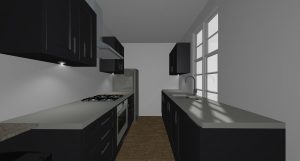
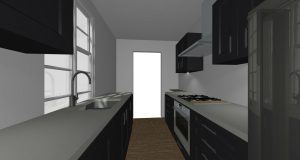
The final zone to consider, if you’re not lucky enough to have a separate eating area, is where you’ll eat all the delicious things you’ve cooked up in your new and improved tiny kitchen. I’ve intentionally modelled this example design off my own very tiny kitchen (which I dream about remodelling), and as can be seen, there’s not a huge amount of dining space available. A kitchen island is out of the question, but there’s potential for a floating shelf that can be used as a breakfast bar/eating area like so:
Wall cabinets can be added to your personal taste. If you want the kitchen to feel taller and lighter, be sparing with where you locate your wall units and keep them away from sources of light. As can be seen in this design, to compliment the cooking zone there’s plenty of wall storage for food and pantry items, and above the drinks zone is it’s own dedicated cabinet for whatever may need to go in there. Try to keep your wall and floor cabinets similar in size, as this is more aesthetically pleasing.
At this point, we’ve got a fully designed kitchen, ready for the final (and most fun) touches: colour, accessories, and the missing appliances! I’ve gone for a dark kitchen with shaker doors, a white worktop with the breakfast bar in a contrasting wood-look finish, a stainless steel extractor, and a black induction hob. Some funky stools next to our little breakfast bar, and we’re done! One ready to go tiny kitchen design!
Leave a Reply
